

Icecast is an open source media streaming server that can stream both audio and video across a network. It is very versatile and customizable. It can be used for running live podcasts or for hosting internet radio stations.
In this guide, I will share my experience of setting up an HTTPS audio stream over Icecast. The guide will assume that you are running Ubuntu 18.04.
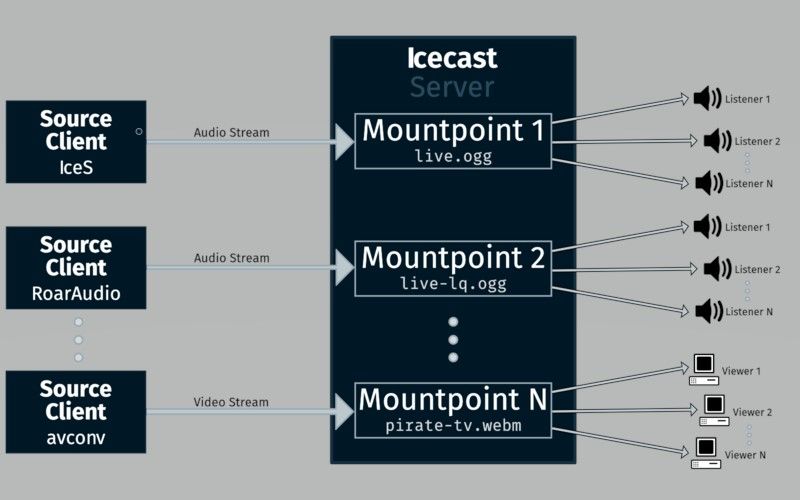
The Architecture
Icecast requires a source client that sends a bitstream to a mountpoint. Listeners can listen to the stream by accessing these mountpoints.
We will discuss setting up source clients later.
Installing Icecast
The Icecast package included in Ubuntu 18.04 repositories is not compiled with HTTPS support. Thus, we will add the official Xiph repository which includes the latest Icecast package compiled with HTTPS support.
- Add the Xiph repository.
sudo sh -c "echo deb http://download.opensuse.org/repositories/multimedia:/xiph/xUbuntu_18.04/ ./ >>/etc/apt/sources.list.d/icecast.list"
- Add the multimedia signing key as a trusted key.
wget -qO - http://icecast.org/multimedia-obs.key | sudo apt-key add -
- Update apt package indexes.
sudo apt-get update
- Install Icecast.
sudo apt-get install icecast2
- Setup SSL.
This section will assume that you already have a SSL certificate from Let's Encrypt with certbot configured for certificate auto renewal. Certbot setup varies slightly depending on whether the server is already running a web server (Apache, Nginx, etc.) or not. The instructions at EFF are straightforward on how to setup certbot based on different scenarios.
Note: You can choose to skip this step and run Icecast without enabling SSL.
Icecast requires an SSL certificate file that contains both the private and public key. Thus, we will concatenate the keys generated by Let's Encrypt, and then move them to our Icecast directory. After that, we will change the ownership of the new key file to Icecast user and group. This will allow the Icecast server to access the new certificate file.
cat /etc/letsencrypt/live/talesofcode.com/fullchain.pem /etc/letsencrypt/live/talesofcode.com/privkey.pem > /etc/icecast2/concat.pem

chown icecast2:icecast /etc/icecast2/concat.pem
Certificates issued by Let's Encrypt are valid for 90 days, and are automatically renewed by certbot. Thus, we should add a post hook to certbot that automatically combines the private and public keys for Icecast upon certificate renewal.
The following line should be added to the file /etc/letsencrypt/renewal/talesofcode.com.conf under the [renewalparams] section:
post_hook = cat /etc/letsencrypt/live/talesofcode.com/fullchain.pem /etc/letsencrypt/live/talesofcode.com/privkey.pem > /etc/icecast2/concat.pem && service icecast2 restart
Configuring Icecast
We will now configure Icecast by editing the Icecast configuration file.
nano /etc/icecast2/icecast.xml
The parameters below are the main parameters required to get us up and running:
<source-password>: the plaintext password used by source clients to connect to Icecast.<admin-password>: the plaintext password used for web administration functions.<port>and<ssl>parameters under the<listen-socket>parameter.- mountpoint parameters under
mount. <ssl-certificate>parameter underpaths.
Refer to Icecast documentation for details on all supported parameters.
The snippet below contains the full icecast.xml file with all parameters set.
<icecast>
    <location>Earth</location>
    <admin>icemaster@localhost</admin>

    <limits>
        <clients>12000</clients>
        <sources>2</sources>
        <queue-size>524288</queue-size>
        <client-timeout>30</client-timeout>
        <header-timeout>15</header-timeout>
        <source-timeout>10</source-timeout>
        <burst-on-connect>1</burst-on-connect>
        <burst-size>65535</burst-size>
    </limits>

    <authentication>
        <!-- Sources log in with username 'source' -->
        <source-password>secret-pass-here</source-password>
        <!-- Relays log in with username 'relay' -->
        <relay-password>disabled</relay-password>

        <!-- Admin logs in with the username given below -->
        <admin-user>ice-admin</admin-user>
        <admin-password>secret-pass-here</admin-password>
    </authentication>

    <hostname>talesofcode.com</hostname>

    <!-- You may have multiple <listener> elements -->
    <listen-socket>
        <port>8443</port>
        <ssl>1</ssl>
    </listen-socket>


    <http-headers>
        <header name="Access-Control-Allow-Origin" value="*" />
    </http-headers>


    <!-- Mountpoints-->
    <mount>
        <mount-name>/stream.mp3</mount-name>
        <stream-name>Tales of Code Live Stream</stream-name>
        <stream-description>Tales of Code Live Stream</stream-description>
        <bitrate>192</bitrate>
        <type>audio/mpeg</type>
    </mount>

    <fileserve>1</fileserve>

    <paths>
        <!-- basedir is only used if chroot is enabled -->
        <basedir>/usr/share/icecast2</basedir>

        <!-- Note that if <chroot> is turned on below, these paths must both
             be relative to the new root, not the original root -->
        <logdir>/usr/share/icecast2/logs</logdir>
        <webroot>/usr/share/icecast2/web</webroot>
        <adminroot>/usr/share/icecast2/admin</adminroot>
        <!-- <pidfile>/usr/share/icecast2/icecast.pid</pidfile> -->

        <alias source="/" destination="/status.xsl"/>
        <!-- The certificate file needs to contain both public and private part.
             Both should be PEM encoded. -->
        <ssl-certificate>/etc/icecast2/concat.pem</ssl-certificate>
    </paths>

    <logging>
        <accesslog>access.log</accesslog>
        <errorlog>error.log</errorlog>
        <loglevel>3</loglevel> <!-- 4 Debug, 3 Info, 2 Warn, 1 Error -->
        <logsize>10000</logsize>
    </logging>

    <security>
        <chroot>0</chroot> <!-- chroot disabled -->
        <changeowner>
            <user>icecast2</user>
            <group>icecast</group>
        </changeowner>
    </security>
</icecast>
Save and close the xml file. You should now be able to start the Icecast server using the command below:
icecast -b -c /etc/icecast2/icecast.xml
If all is well, Icecast status page should now be accessible from a web browser on port 8443 https://your-domain-or-ip:8443. Make sure that the port 8443 is allowed on the ufw firewall.
The last step of server side configuration is to enable Icecast on system reboot.
systemctl enable icecast2
Setting Up the Source Client
This section will demonstrate how to use Broadcast Using this Tool (BUTT) or Liquidsoap as source clients. These source clients can be used to stream directly from Line input, or to stream from an audio file. BUTT offers a graphical interface, while Liquidsoap has a scripting language and is launched from the command line. You can use either of them as your source client.
Option 1: Broadcast Using this Tool (BUTT)
- Download and install BUTT (varies based on OS of choice).
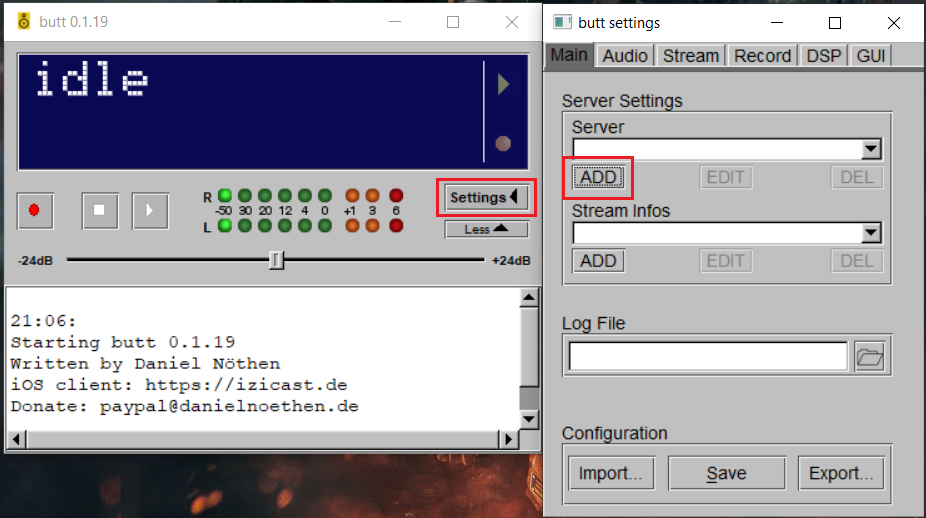
- Launch BUTT and go to "Settings".
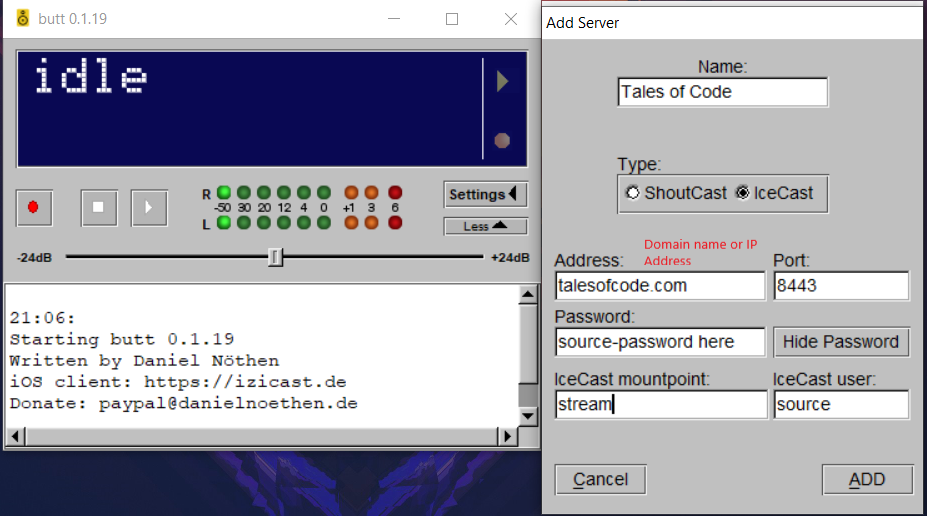
- Add a server with your Icecast server details.
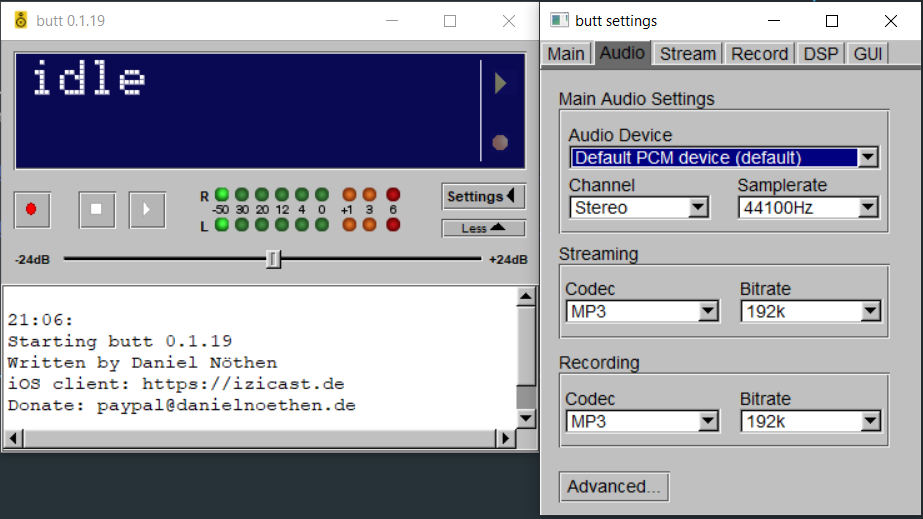
- Navigate to the "Audio" tab to configure your input device and streaming codec.
- Go back to the "Main" tab and hit the "Save" button.
- Click the play button in BUTT's main window. You should see that BUTT has successfully connected to your Icecast server.
- Visit
https://your-ip-or-domain:8443/stream.mp3. You should now be able to listen to the audio stream sent by BUTT on the Icecast mountpoint.
Option 2: Liquidsoap
- Download and setup Liquidsoap (varies based on OS of choice).
- Create a
liqfile which will contain our Liquidsoap configuration. - Copy the code snippet below to your
liqfile. Sethostto your domain name or IP address, andpasswordto your source password configured in Icecast server.
set("log.stdout",true)
set("log.file",false)

# Input from default audio port
s = input.portaudio()

# An icecast output in mp3 format
output.icecast(%mp3(bitrate=192),
              host="talesofcode.com", port = 8443,
			  password = "source-password-here",
              fallible=true,
              mount="stream.mp3",
              s)
- Start Liquidsoap from the command line, passing the
liqfile as input.
liquidsoap file.liq
- You should see that Liquidsoap has successfully connected to your Icecast server.
- Visit
https://your-ip-or-domain:8443/stream.mp3. You should now be able to listen to the audio stream from your source client on the Icecast mountpoint.
Liquidsoap is a very powerful open source tool. Refer to its documentation for advanced examples and use cases.